Cooking is becoming a lost art these days. It seems like the less we cook, the more we love to watch other people cook on TV! We want to eat, but we run out of time in our busy days, so we outsource the cooking to someone, ANYONE else. We order out, buy a pizza, drive through, or grab pre-cooked and pre-packaged food at the grocery store.
Today it has become so ordinary to open a box, a bag, or a wrapper that we’re not quite sure how to approach food in its fresh form. We’re intimidated: what do you DO with a head of bok choy, or a whole head of cauliflower? Let’s just ignore the leeks. So even if we buy the ingredients to cook, they sit in the back of the frig until they rot. Meanwhile, we’re still eating out of a bag…

But, we connect deeply with the idea of homemade food. We like to watch it on TV and we like the idea of it. We all like the thoughts of big family holidays and all the food that we share (family drama notwithstanding!). And I can hear you saying, “Oh no, not me! I don’t like cooking! Too much time, work, prep – I’d rather just have my food APPEAR!” Close your eyes for a second and think about the smell of fresh baked bread or cinnamon buns, or a simmering pot of soup on a wintry day. Smell the yeasty baking bread, the cinnamon floating in the air, rosemary in the roasting chicken, the garlic and onions in the frying pan… See? You do want home cooked foods! So how do we overcome our time limitations and fear of unprepared foods?
I’ve learned to love cooking. But it wasn’t always that way. Even now, I still get frustrated when I am really pressed for time. Here are a few benefits that I didn’t recognize when I first started cooking…
1. Pride in a finished product
A recipe doesn’t always come out perfectly, but even when it doesn’t, you made it! I love feeling like I took raw ingredients and made a beautiful soup, or chicken or side dish.
2. Nourishing others
It’s a great feeling to set food in front of family or friends and know that you are putting something good in their bellies.
3. Compliments
Stay with me – it’s not all about accolades and pats on the back. But it’s a warm, fuzzy feeling when other people like your food creation!
4. Knowing your food
This is a big one for me. Because commercial food has SO many different chemicals and additives, I try HARD to avoid as much pre-made food as I can. But if I made it, I know what’s in it. Of course, you need to be vigilant about the source of your food ingredients (but that’s another post!). Then when I serve a dinner, I feel great about what is feeding those I love.
5. Tastes better!
I love being able to season my food the way I like: more heat, more spice, less salt. And almost no matter what, if you make it, it tastes better than anything in a package!
Enough on the benefits. There are more, but we still haven’t solved the problem of time and what to do with the food! Some friends have been asking me to share some recipes, so I will write a few of my tips and quick recipes below. I’m leaving out some of my favorites, because they are more time intensive. Those are recipes for a lazy Saturday, not a quick week night dinner.
Best Tips
1. Prep in advance.
If your veggies are cut up (onions, mushrooms, cauliflower) for a stir fry or roasted veggie salad, you can walk in the kitchen and pull out bowls and pans and get to cooking! Otherwise, your prep work takes a big chunk of time. When the groceries come in the house, chop, dice, and repackage for use. Then you won’t avoid the cooking because things aren’t ready for you. If you have to, buy the ingredients pre-chopped. I know, I just said don’t buy prepackaged! And I don’t prefer this option, mainly because you usually can’t get it organic and you pay a huge premium price. But if it gets you cooking…
2. Meal plan
Don’t groan – I hear you complaining! I know, if we had all this time, we wouldn’t be pressed into picking up food on the fly. But I’m just talking about defrosting the chicken the night before, and pouring the marinade over the chicken in the freezer bag before you run out to work. How about taking 15 minutes after dinner or after the kids go to bed to chop veggies for a salad for your lunch or dinner tomorrow? My point is, don’t walk in the house at 6 pm and need to start from scratch – you’ll never make it! YOU get to stack the deck for your success.
3. Use your freezer
Prepping veggies in advance can allow you to cook some and freeze some for next time. Yes, there will be some change in texture, but they’ll still be good. When you cook a soup or casserole, make double and freeze half. Then you have a meal for another day that you can defrost the night before and NOT cook that night.
4. Make salads and slaws with hard veggies – kale, cauliflower, cabbage, broccoli. They last several days in the frig!

Juicy Roasted Chicken

*note: You need a cast iron skillet or other oven proof pan and a meat thermometer for this recipe.
You can dress this recipe up and add any herbs or spices you like.
Whole chicken, giblets removed from inside
2 tbsp. olive oil
2 tsp salt and 1 tsp pepper (or to taste)
1 tsp each garlic and onion powder (optional)
Preheat oven to 450 degrees with skillet in the oven for the heating.
Pat chicken dry with paper towels.
Rub oil over the chicken. Salt and pepper the inside and outside of the chicken and add any other seasonings you like. I like to add fresh rosemary inside and outside!
Place your meat thermometer in the breast meat, not touching the bone.
Put the chicken, breast side up into the pan (it will be very hot, so be careful). Be sure you’ll be able to see the thermometer when the door is closed.
Roast at 450 for 25-30 minutes.
Then turn off the oven and leave the chicken in with the door closed until the meat thermometer reads 65. Then remove it from the oven and wait until the thermometer reads 70. Let the meat rest for at least 10 minutes and then carve it up and serve!
Roasted Veggies (cauliflower or broccoli)

Cut up the head of cauliflower or stalks of broccoli to the size you like to eat.
Remove the core from the cauliflower or woody stalks from the broccoli.
Dump them in a bowl and drizzle olive oil over the vegetable. Salt and pepper to taste. If you’re doing broccoli, sprinkle a 1/2 tsp of sugar over the stalks (brings out the sweetness in the broccoli!).
If you want, add a couple of tablespoons of big chunks of fresh chopped garlic to roast with the veggie.
Roast at 450 for 10-12 minutes or until the edges are browned and you can pass a fork though the stalk.
Enjoy for dinner, and add it to your green salad for lunch the next day!
Raw Green Bean Salad
(my easier version of the delicious recipe from Deb Perelman at smittenkitchen.com – I left out the celery because I almost never have any left, but it’s good if you have it!)
frozen green beans
1/2 bulb of fennel
1/2 red onion
1/2 cup roasted almonds
1/4 cup red wine vinegar
1/4 cup water
1 1/2 tsp sugar
1 tbsp. kosher salt
juice of one lemon
Rinse as many green beans as you need for your meal under warm water until defrosted. Cut the red onion in thin half-moon slices. Mix the sugar, salt water and vinegar and soak the red onions in the brine (30 minutes minimum, but you could do this the night before and that is even better!). Thinly slice the fennel (with a mandolin if you have it) and toss with lemon juice to prevent browning. Put the almonds in a zip top back and smack with the back of a spoon to break them up a little. Arrange the green beans on the plates with the fennel, pickled red onions, and almonds on top. Drizzle with the red onion brine. Yum!
Wheat Berries
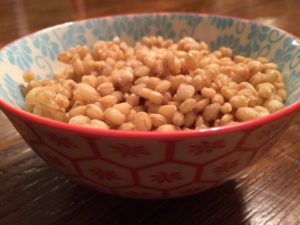
These are a good substitute for rice unless you are gluten free. They are chewy and delicious!
1 cup wheat berries, soaked overnight
3 cups water
1 tsp salt
Boil water. Add soaked wheat berries and salt. Simmer covered for 30 minutes or until they are chewy (the water should not be gone). Drain the wheat berries and serve. If you make more than you need that day (and you should!), these freeze beautifully to add to salads or use as a side for another meal.
These are just a few of my quick recipes to inspire you to get in that kitchen! What are your favorite recipes?
Comments2
Yummy. Ok so reading this right before dinner is probably a good and bad idea. 😉
One of my favorite recipes is my fruity coleslaw. I add pineapple and Granny Smith apples for texture. It also brings in a sweet and sour flavor. I love using a lemon vinaigrette for the dressing. It’s light and healthy and goes great with grilled fish or chicken.
Andrea, I have watched my Grandmother conduct a meal plan similar and smart as the one you shared. Yet, I have veered so far from it. Thanks for this healthy and wise reminder. I will be trying the cauliflower recipe.-Lisa G.